RISKUL has four RAM and a Risk Register that can be used within Projects. Select the Project and then select the desired RAM tab. RAM can be copied to another Project if required [see Copying a RAM]. Any number or combination of RAM can be used with RISKUL RAM following a hierarchy that can be used in all organisations.
HAZID [Hazard Identification]
HAZID is a review of methodology and early stage engineering or a concept review to assist with final methodology decisions based on an analysis of the hazards within the proposed solution.
The purpose is to identify hazards and engineer solutions with risk mitigation assessed during design phases introduced to limit the need for hazard control during operational phases.
Identification of hazards should be considered the main objective with mitigation applied during the design process to each identified hazard; risk classification is not applied to the HAZID process.
HAZOP [Hazard & Operability Study]
A HAZOP is used to identify issues related to operability and improvements that can be implemented to avoid incidents.
The HAZOP should focus on specific activities and be supported with information / procedures for planned activities. The procedure is an instruction written to ensure that an operator completes actions to achieve an objective, each step reviewed as requiring an action at a time in a sequence. The intent of the procedure should be clear, and the operator needs to understand the conditions at the start of the procedure and the required condition at the end of the procedure.
The output of the HAZOP is to identify hazards and operability issues. Guidewords pertinent to the process are used to highlight missing information, errors or deviations etc which could lead to an undesired event.
HIRA [Hazard Identification Risk Assessment]
HIRA is used to identify hazards and control measures associated with groups or sequences of activities.
The HIRA is a higher level of risk assessment that assesses a process or operation that is made up of several activities.
TRA [Task Risk Assessment]
A TRA is used to identify and mitigate hazards associated with specific activities. Generic TRA can be compiled for standard / repeat activities where the methods of work do not change.
TRA should have input from the people who are undertaking the work and be reviewed regularly.
Risk Register
The Risk Register is used to identify and track all risks associated with the Project from conception to completion. It is a live document and should be updated frequently to ensure that content remains current.
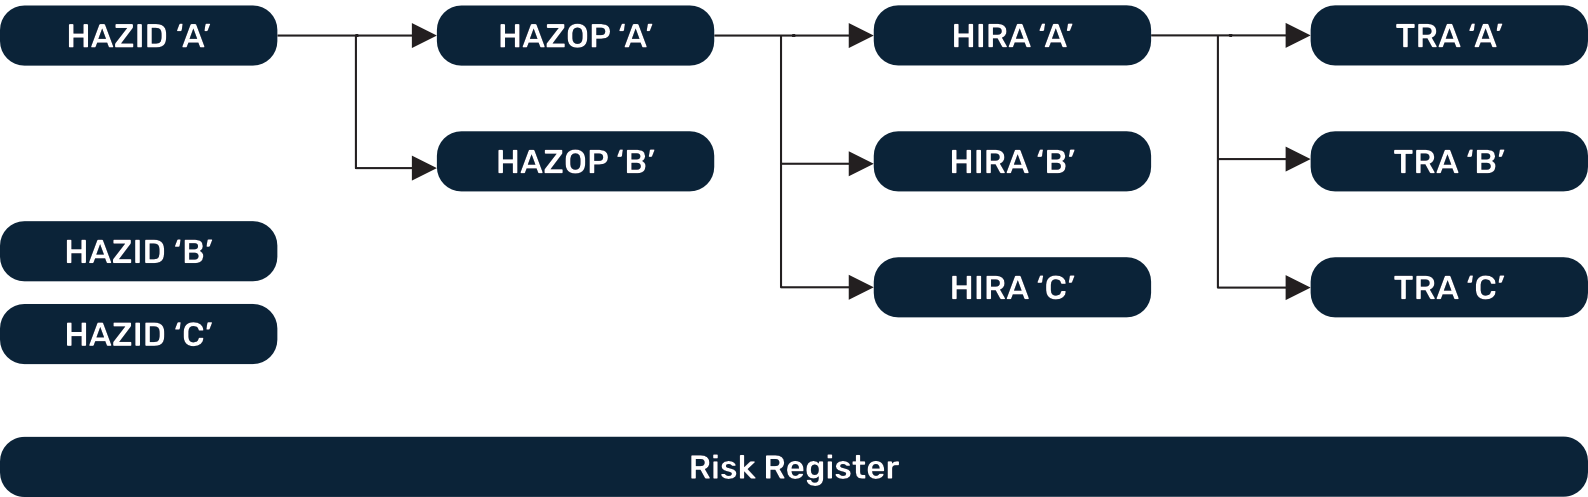
RAM Hierarchy Example
The diagram below provides an overview as to how RAM hierarchy can be applied within RISKUL.
The Project (name) is imported from the Project Room Identifier and Short Text.
RISKUL generated from the Identifier Short Text, the RAM prefix i.e. TRA, HIRA (HIR), HAZOP (HOP), HAZID (HID) and a sequential number.
E.g. If the Identifier (name) is ‘Test Project One’ and the Short Text ‘TPO’ the TRA generated number will be:
TPO-TRA-001, a HIRA would be TPO-HIR-001 and so on.
As RISKUL uses sequential numbering and a Short Text Identifier that is User selected, the document numbers assigned to RAMs will not be seen as duplicates within other Projects if the Short Text Identifiers are different.
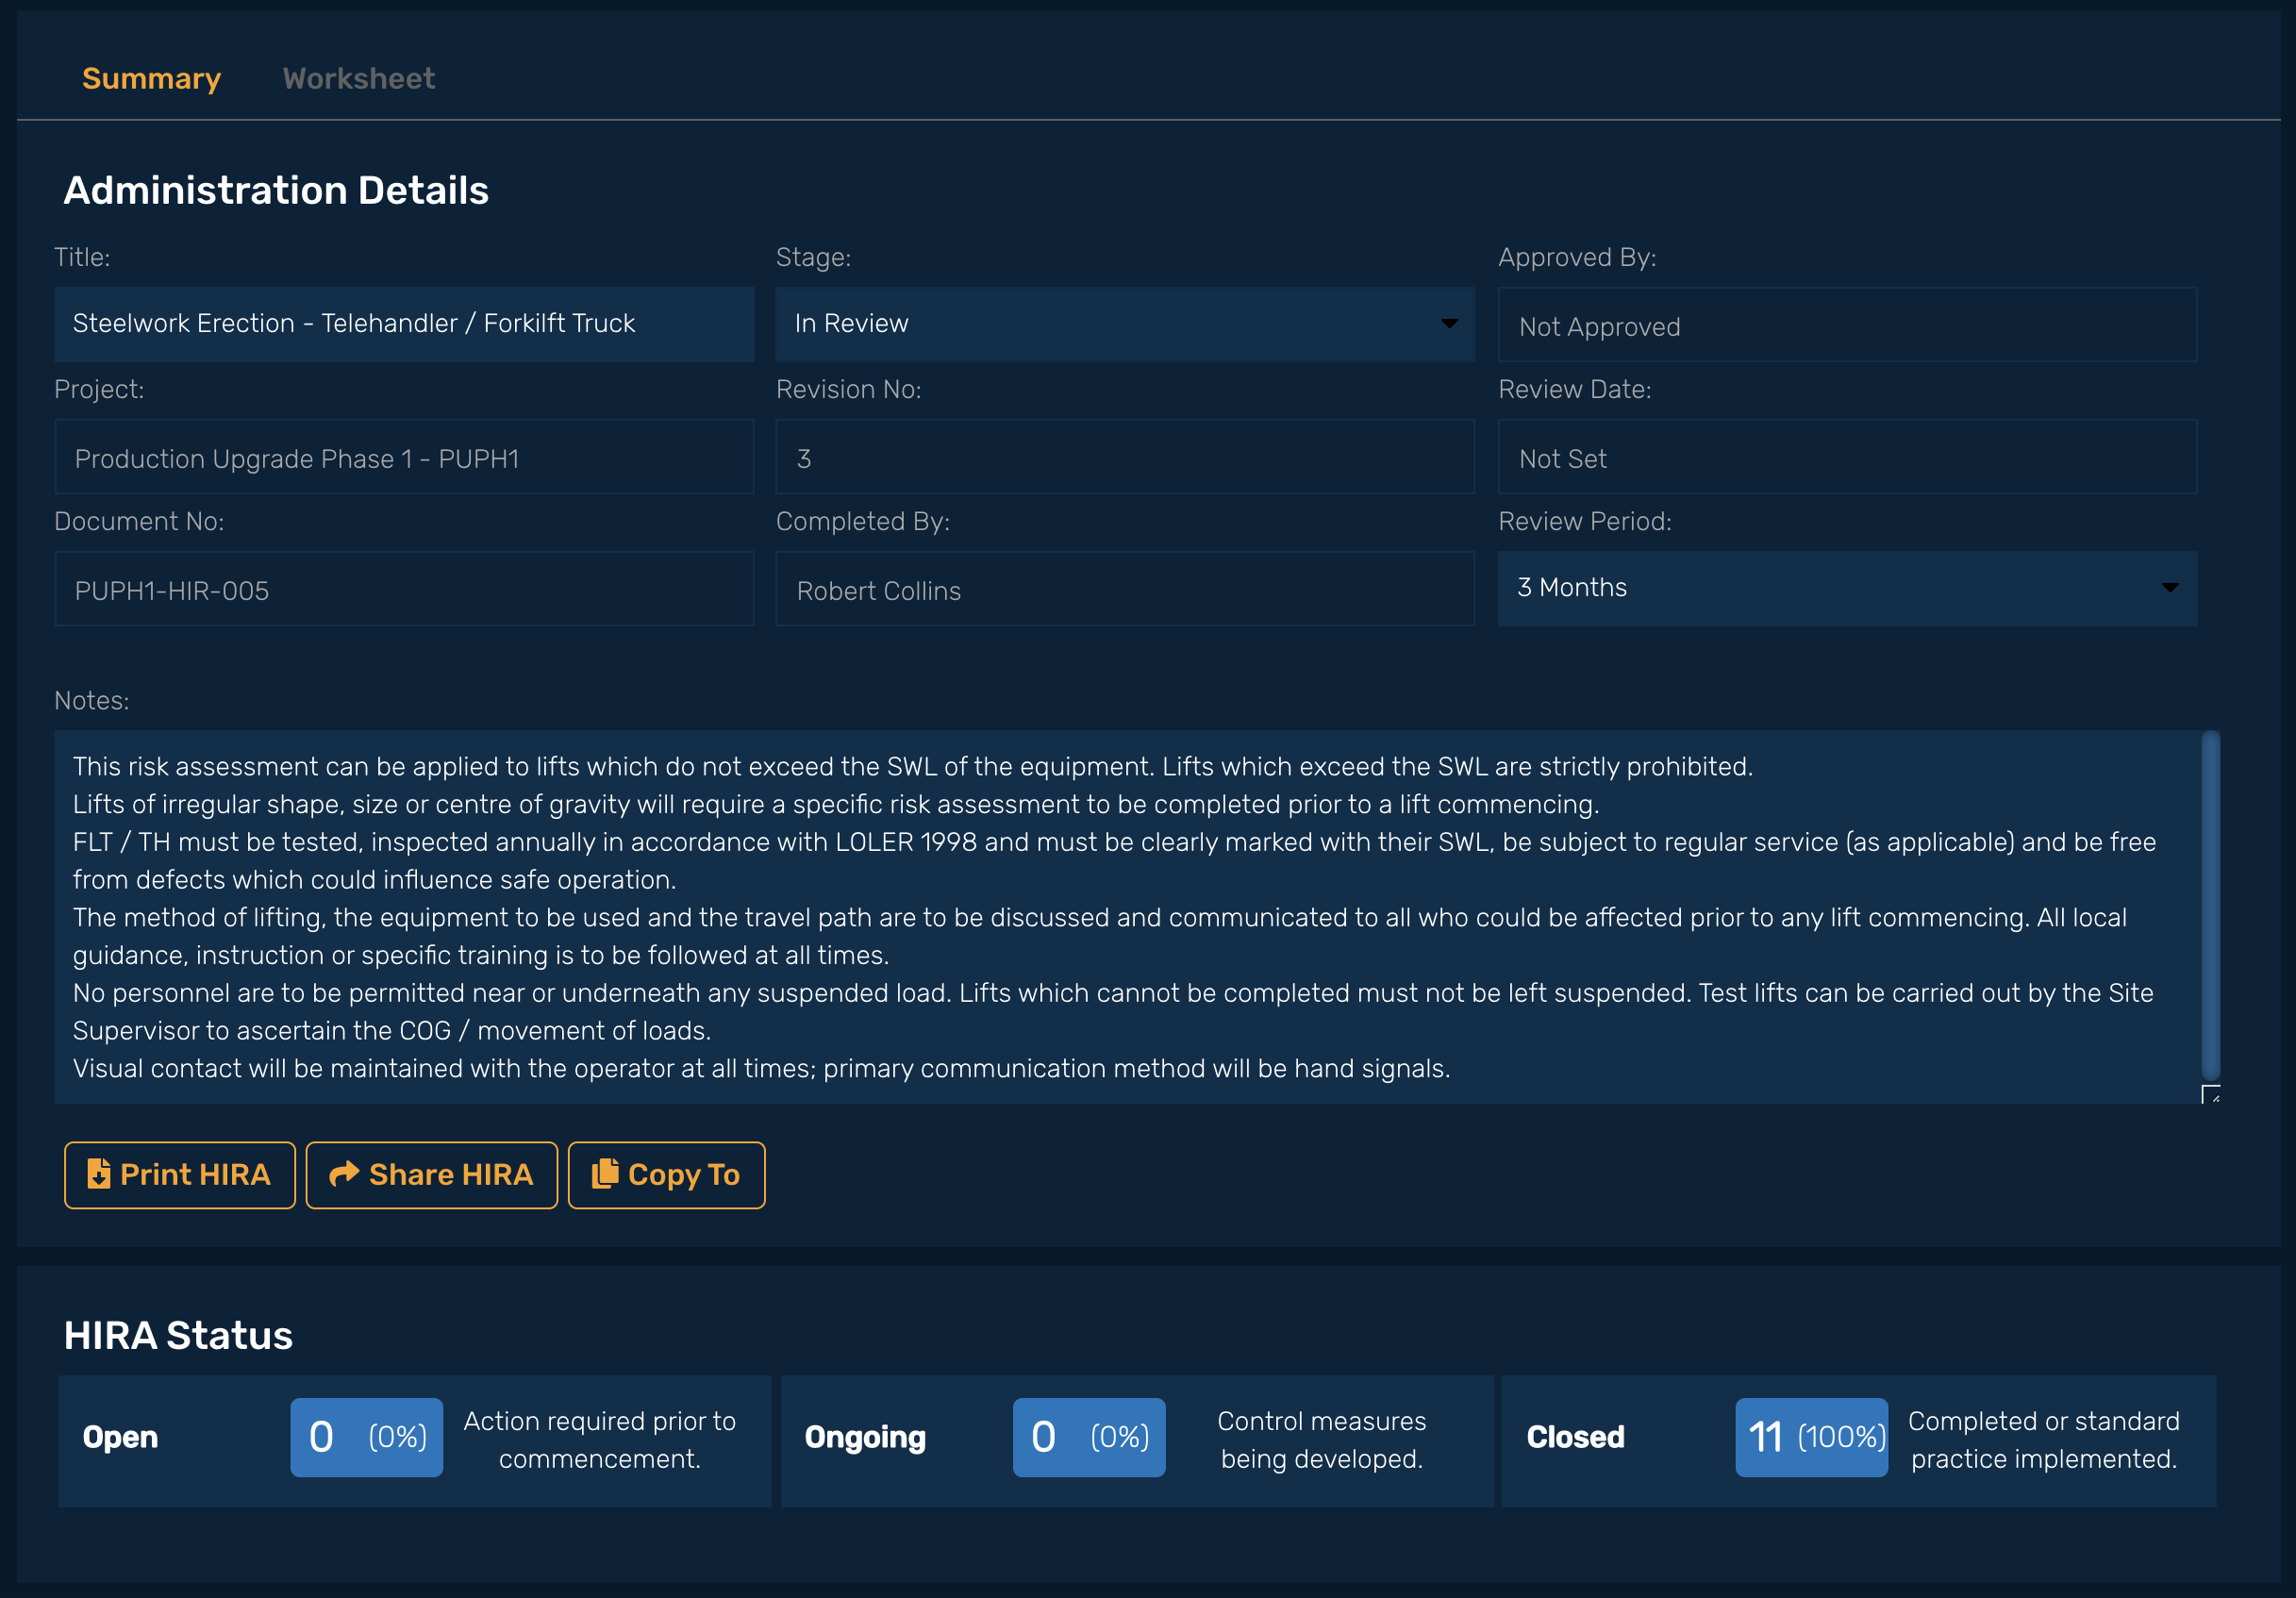
Title is a free text area, this is used to name the RAM.
Notes are available on all RAM and can be used to inform Users of specific requirements / information that is needed to be able to work safely. Notes are free text, the text box can be expanded by dragging and increasing the text box on the lower right hand corner.
Notes can be updated on any RAM irrespective of the RAM Stage without affecting the RAM revision numbering. When a note is updated a ‘Save Notes’ button will appear to the right of the Notes text box, click to save the changes.
A Stage can be assigned to each RAM, RISKUL has 4x Stages that be selected:
| Stage Term | Description |
|---|---|
| Draft | RAM started but content is not complete. |
| In Review | RAM completed and is currently ‘In Review’; the RAM should remain ‘In Review’ until ‘Approved’ |
| Approved | RAM ‘Approved’ |
| Retired | RAM has been withdrawn from the Project. |
Stage can be changed if the User has Project Admin, Editor or Approver access. If a RAM is Approved then it can no longer be edited unless the Stage is returned to Draft or In Review.
Retired RAM will show in the bottom of the Assessment List. If a RAM is no longer required Stage ‘Retired’ should be selected. Once a RAM is Retired it can be returned to an earlier Stage if the User has Admin, Editor or Approver access. RAM can be deleted from the RAM Summary page by a Project Admin User, RISKUL generates sequential document numbers, it is not possible to delete a RAM and then reuse the sequential number.
The ‘Status’ choices are selected by the User. RISKUL definitions are:
| Status Term | Description | Applicable to RAM |
|---|---|---|
| Open | Action required prior to commencement. | HAZID - HAZOP - HIRA - TRA |
| Open | Work / monitoring of the action is ongoing. | Risk Register |
| Ongoing | Control measures being developed. | HIRA - TRA |
| Closed | Completed or standard practice implemented. | HAZID - HAZOP - HIRA - TRA |
| Closed | Action is completed. | Risk Register |
| Transferred | HAZID action has been transferred to HAZOP. | HAZID |
‘Ongoing’ status selection should be used when a HIRA or TRA is being developed but not considered complete E.g. in ‘Draft’.
‘Closed’ status allows the User to close the activity / task based on the control measure that has been identified, this could be a statement which makes it obvious that the task / activity is appropriately managed or reference to a standard company protocol or practice that will be adhered to ensuring that the control measure adequately manages the hazards.The ‘Ongoing’ status selection should be used when a HIRA or TRA is being developed but not considered complete E.g. in 'Draft'. RAM with 'Open' or 'Ongoing' status can be approved if required.
RISKUL default review frequencies for all RAM are 1 week, 1 month, 3 months, 6 months, 12 months. When creating a RAM a review period can be specified. Once a RAM is ‘approved’ the ‘Review Date’ will auto-populate with an advance date calculated from the creation date + the specified review period.
E.g. A RAM is created on the 1st January, the review period is set as 1 week, the Review Date will display as the 7th January.
The ‘Review Date’ column shown on the RAM Summary Dashboard Page will change to yellow when the review date is due within 30 days and red when the date has passed. A pop up will also present on the Summary page stating ‘This assessment is due for review within 30 days’ or when the ‘review date’ has passed the text will state ‘This assessment is overdue for review’
RAM can be approved without selecting a review date, leaving the review date selector at ‘Select Review Period’, will result in the approved RAM review date showing as ‘Not Set’.
All RAM revisions will default to #1 when the RAM is created. The revision will remain at #1 throughout all Stages of the RAM until it is Approved. To update a RAM the Approved stage will need to be returned to an earlier stage such as Draft or In Review. Once the changes have been made the RAM can be re-approved; once re-approved the Revision number will sequentially increase.
RAM can be set as Approved by Users assigned as Approvers. Once Approved a RAM can no longer be edited until it is returned to an earlier Stage.
When RAM are created the last user to edit the content will show as the ‘Completed By’ name. To ensure that ‘Completed By’ and ‘Approved By’ are not the same User [if they are both approvers] the approver must ensure that no changes are made to the RAM content that requires saving just prior to approving. The Stage on the Summary page can be changed to Approved, the ‘Completed By’ and ‘Approved By’ fields will show the different users involved in creating the RAM.
RISKUL Pro [Single User Package] also allows for RAM to be marked 'Approved'.
Users can share RAM outside of the RISKUL platform. This is to enable on-pass of RAM to external persons i.e. to send draft RAM to a Client or to send a specific RAM to someone who needs it.
Guest access is managed through the ‘Share XXXX’ button on the RAM Summary Tab.
Selecting ‘Share XXXX’ will bring up the ‘Share Guest Access’ pop-up.
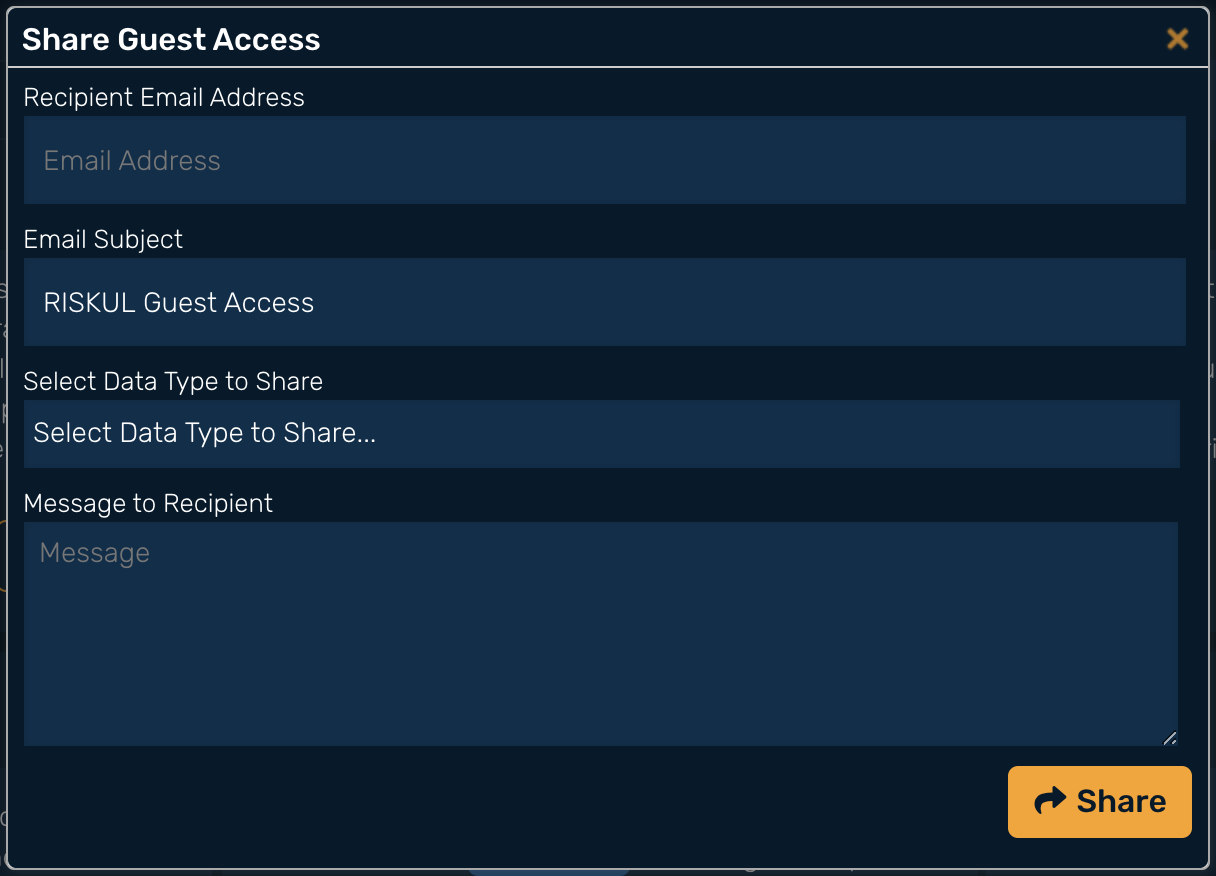
Enter the recipient email address.
Email Subject; the email subject field will default to ‘RISKUL Guest Access’ however this can be overtyped and edited.
Select Data Type to Share; will present with a drop down of the Share options for the specific RAM. The Share options are the same as the Export & Print options. Select the configuration that you wish to share.
Message to Recipient; this is a free text field in which the message to the recipient is written.
Click ‘Share’
RISKUL will send a system non-reply email to the recipient. The email will consist of the content inputted in the ‘Share Guest Access’ pop-up and a link. Once clicked the link will open the shared RAM in the recipients browser to enable them to look at the content. The link will be valid for 7x days after which time the link will not work.
There is no limit to how many can be shared but only 1x RAM can be shared per system email.
Ensure that the recipients are aware of RAM being emailed to them and that the no-reply@riskul.com email does not go into junk folders.
Priority Risks can be selected from the Risk Register, HAZID, and HAZOP worksheets. Priority Risk is user selected content considered to be a priority, requiring specific focus. To select / de-select content and highlight it as a Priority Risk select the tick box next to the ‘Id’ column on the Worksheet, a tick mark will show indicating that the risk has been identified as a Priority Risk. There is no limit to the amount of Priority Risks selected however to enable an effective process to manage the identified content organisations should decide on a maximum number. Priority Risks can only be selected from ‘Open’ content. HAZID content selected as a Priority Risk and transferred to HAZOP will display as Priority Risk on the HAZOP display. Content which is closed will result in the Priority Risk automatically de-selecting. Priority Risk content selected from the Project Dashboard will link to the Summary Page for the Worksheet in which the content is located.
Each RAM Worksheet has a Summary tab.
| Header | Description |
|---|---|
| Title | Imported when Adding a RAM. The Title can be edited by overtyping. |
| Project | Imported when Adding a RAM. |
| Document No. | Imported when Adding a RAM. |
| Revision No. | Imported when Adding a RAM. |
| Stage | Imported when Adding a RAM. An alternative Stage can be User selected if required. |
| Completed By | Auto populates with the name of the User currently working on the RAM. |
| Review Date | Auto populates once the Review Period has been assigned AND the RAM is set to approved. |
| Review Period | Review period for the RAM. |
| Notes | Imported when Adding a RAM and can be edited from the Summary tab. |
The Status for each row entered into the Worksheet. Worksheet status selection will display as Open, Closed, Transferred depending on the RAM.
See Export & Print RAM.
See Guest Access.
See Copying a RAM.
Project Admin can delete RAM from the RAM Summary Tab. Deleting a RAM will remove it from RISKUL, deleted RAM cannot be recovered. Prior to deleting the RAM, Project Admin will be asked to confirm the delete. Once deleted, the RAM Id number cannot be re-assigned to another RAM.
PPE Requirement can be selected from the PPE Requirement added when configuring PPE Keywords. Additional keywords can be added and saved to the PPE Keywords as required
Safety Precautions can be selected from the existing Safety Precautions added when configuring Safety Precautions Keywords. Additional keywords can be added and saved to the Safety Precautions Keywords as required.
Click the ‘Add’ button.
Project is RISKUL generated content and cannot be edited from this page. See Projects.
Document Number is RISKUL generated and cannot be edited. See Document Numbers.
Free text, enter a title for the RAM.
The Stage will default to ‘Draft’ for all new RAM added.
Select the Review Period for the RAM.
Revision is RISKUL generated and cannot be manually edited. See Revision.
RAM created in one Project can be copied to another Project. To copy a RAM:
Click on the required RAM Summary Page
Click the ‘Copy To’ button
Select the destination Project from the drop down list of Projects that have been created
Click the ‘Select’ button
The RAM is now available in the selected Project Room.
NOTE: Copying RAMs between Projects will transfer the RAM Summary and Worksheet. As the Project RC Matrix and Users may be different the copied content will remove any assigned RS / RRS and default to ‘Low’, Responsible will be removed, Status will default to Open, Revision will default to 1 and the RAM will revert to ‘Draft’.
Individual rows from one RAM can be copied to another RAM within the same Project. The receiving RAM must be the same type.
The row has now been copied to the chosen RAM and can be edited as required.
NOTE: Approved RAM will not be available for selection as a destination for copying rows. The RS / RRS and Responsible content will remain as the row is being copied within the same Project.
RAM Worksheets come with fixed headings, the headings differ depending on the RAM.
Column widths can be adjusted by clicking and dragging on the right hand vertical border. RISKUL will retain the column width settings for each User once established however the settings will revert back to default widths if the cache is cleared.
To add a new row to a worksheet click ‘Add Row’. A new row will be added with a sequential Id number. RAM that allow for ‘risk scoring’ [HIRA, TRA, Risk Register] will auto populate with the lowest Probability, Consequence and Risk Score. If the RAM has the ‘Date On’ column or similar RISKUL will auto populate with the date. The ‘Status’ column will default to ‘Open’.
To delete a row select the row by clicking to the left of the Id and then select ‘Delete Row’. Once deleted a row can be recovered by selecting ‘Undo’ providing the worksheet has NOT been saved after the row was deleted.
Worksheet rows can be reordered in the worksheet by clicking the up / down button on the left of the worksheet. The row will retain the Id number but can be positioned anywhere within the worksheet. Once positioned, the worksheet row order is retained when printed / exported. Remember, the row Id is an identifier and does not need to be a sequential number sequence.
Filters are available and placed at the top of the page on all RAM Worksheets. Clicking the filter box will present drop down options for the filter that can be applied, multiple filters can be applied at the same time. Selecting ‘Print’ from the Worksheet and Summary page will print the Worksheet with the applied filters.
To remove a specific filter, click the ‘X’ next to the applied filter in the filter box. To remove all filters applied to a Worksheet, click the ‘Clear Filters’ button at the bottom of the Worksheet.
Filter options are dependent on the RAM selected.
| Filter | Description | Applicable to RAM |
|---|---|---|
| Any Exposure | Filter between Internal, External exposure or both. | HAZID |
| Any Status | Filter between Open, Ongoing, Closed, Transferred. | HAZID - HAZOP - HIRA - TRA - Risk Register |
| All Applicable | Filter from the Applicable column. | HAZID |
| All Responsible | Filter of names assigned as responsible for the action.
If an action has not been assigned to a person then the filter can be applied to show ‘Not Set’. |
HAZID - HAZOP - HIRA - TRA - Risk Register |
| RRS | Filter from the assigned RRS score [Low, Medium, High]. | HIRA - TRA - Risk Register |
| All Risk | Filter between Priority Risk / Non-Priority Risk. | HAZID - HAZOP - Risk Register |
| All Areas | Filter from the Areas column. | Risk Register |
| All Sub Areas | Filter from the Sub-Areas column. | Risk Register |
| All Initiated By | Filter on the name of the User who added the action. | Risk Register |
| All Mitigation Owners | Filter on the name of the Mitigation Owner | Risk Register |
Adding rows with filters applied is designed to enable the User to add specific content related to the filtered content. HAZID, HAZOP and Risk Register worksheets will allow new rows to be added when filters are applied. NOTE, rows can only be added when 1x filter per filter box is selected. If multiple filters are selected the user will be asked to remove filters before the row can be added.
The added row will display with the filter content added by default. If the filtered content is changed when being added the row will be added but not be visible as only the filtered content is displayed.
E.g. A HAZID worksheet is filtered on ‘Exposure’ to display ‘External’ content only. A new row is added, the ‘Exposure’ content is changed from ‘External’ to ‘Internal’. As the ‘External’ filter is applied the row will be added but not be visible until the ‘External’ filter is removed.
Risk Register filters do not allow for rows to be added when ‘Area’ & ‘Sub-Area’ filters are both selected. ‘Sub-Area’ content is linked to ‘Area’ content, rows can only be added with ‘Area’ filters applied. It is NOT possible to add content to the Risk Register when the ‘RRS’ filter is applied, this must be removed to enable content addition.
Rows cannot be added to HIRA or TRA worksheets with an active filter filter applied. To disable the filter click back into the filter box and select ‘Any / All’.
Each RAM has a Tab. Information displayed varies depending on the RAM; content includes:
Assessment List - Listing of the RAM created
A summary of the RAM Stages
A summary of the Status of all items identified on all RAM
Chart display of Residual Risk Score for Draft, In Review & Approved [HIRA, TRA] & Residual Risk Score for Risk Register row entries
A description of the Risk Acceptance Level used on the Risk Classification Matrix
Function to add, edit RAM and RC Matrix
See Export and Print.